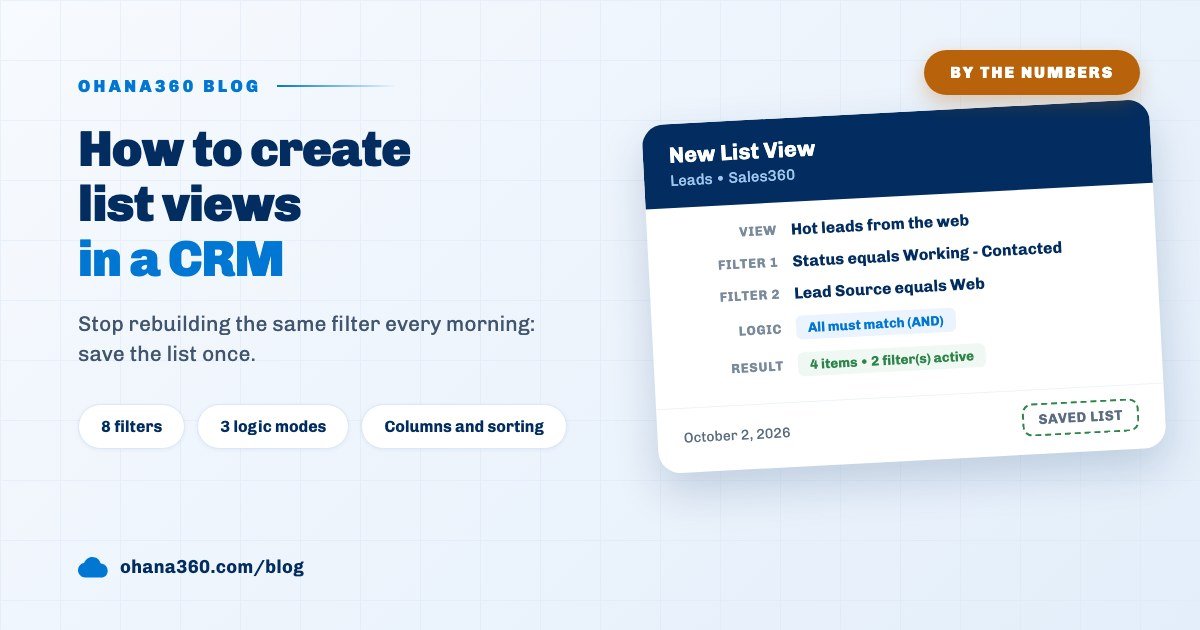
A list view in a CRM is a record list saved together with its filters. In Ohana360 you click the view name on the tab of an object, choose New List View, enter a name and up to 8 filters and save. The view opens at once and is one click away on every later visit. Columns, sorting and inline editing are managed on the same screen.
Ohana360 is a business cloud that keeps sales, service and marketing records in one database, and the tab of every object opens with the same list component: Leads, Opportunities and the custom objects you build yourself. That is why the numbers below belong to every list in the product, not to one object. This post goes by the numbers: first eight figures, then where each one sits on the screen, and at the end what a list view does not do.
What is a list view and why save one?
A list view is a list that shows the records of one object through certain filters and is stored under a name. The reason to save it is simple: if you ask the same question every day, you should not rebuild the answer every day.
Three situations tell you a view will pay off:
- You keep building the same filter. If "leads from the web that are still being worked" is the list you check every morning, that is a view.
- Everyone on the team looks at a different list. If "which opportunities" comes up in the meeting, a single shared view ends the debate.
- You are about to make a bulk fix. First isolate the records with a view, then select them and apply a bulk action.
Every new user starts with two sample views: one on the Opportunities tab that shows amounts of 400,000 and above, and one on the Cases tab that shows cases with the top priority. Opening them and reading their filters is a good place to start.
How do I create a list view in Ohana360?
A list view is created by clicking the view name on the tab of the object and choosing New List View, and it opens as soon as it is saved. The same window is also reachable from the List View Controls menu in the toolbar.
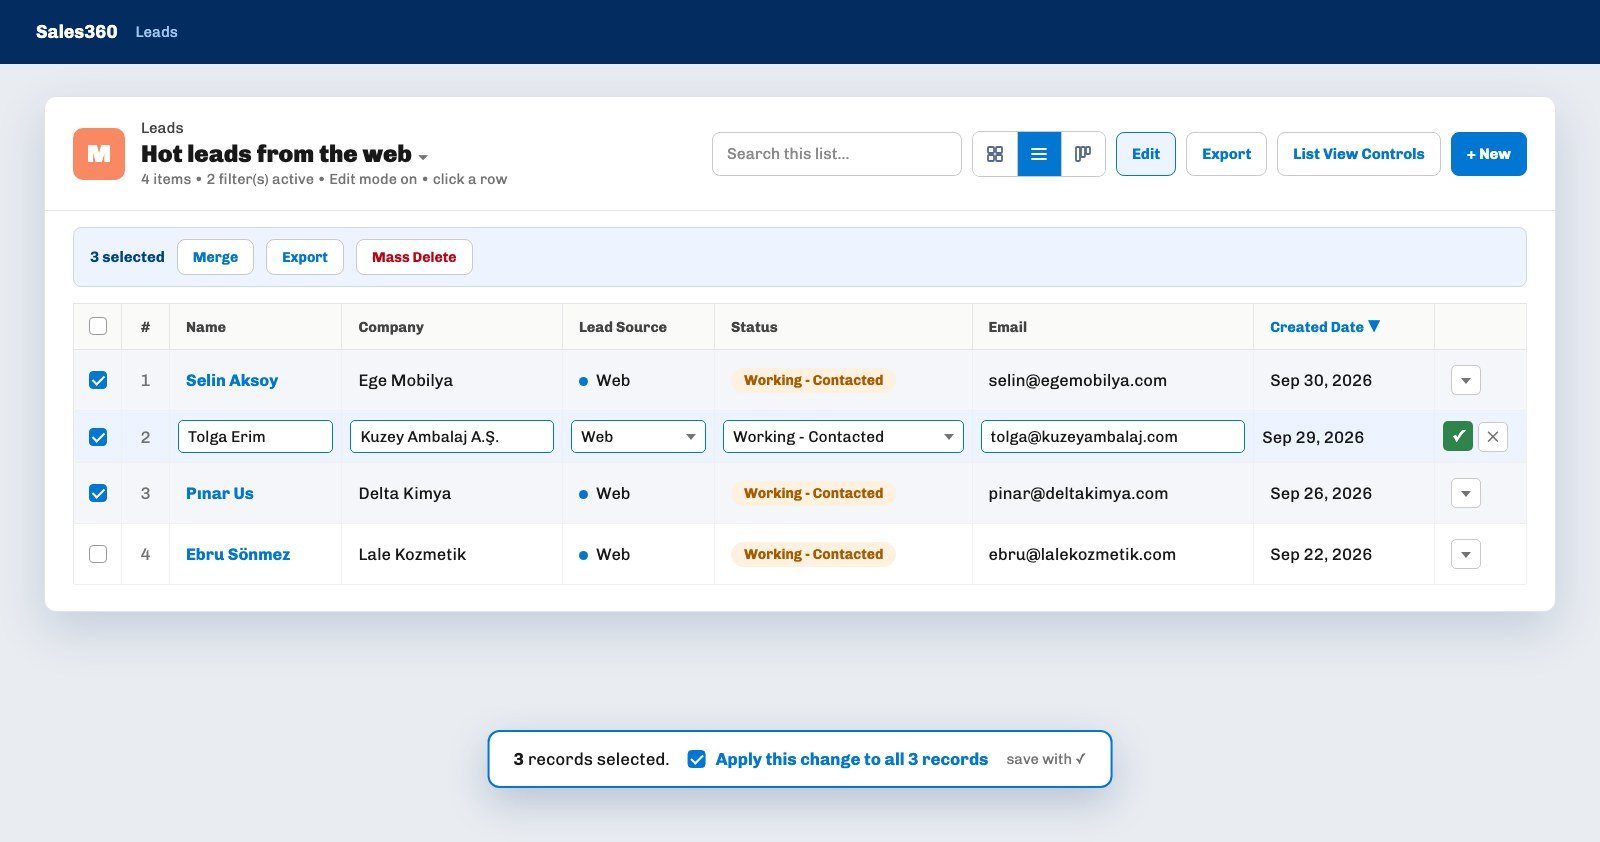
- Open the tab. Leads, for example. The name of the active view sits under the title; when no view is selected the name is All.
- Click the view name and choose New List View. The menu lists your personal views, the shared views and, at the bottom, the link for a new one.
- Type a view name. It is the only required field. Phrase it like the question the list answers: "Hot leads from the web".
- Enter the filters with Add Filter. Each filter is a field, an operator and a value. A view takes up to 8 filters; a filter whose value is left empty is not saved.
- Choose the filter logic. When you add a second filter the Filter Logic row appears: All must match (AND), Any can match (OR) or Custom logic.
- Save. The view opens; under the title you see the record count and a summary such as "2 filter(s) active".
Every later adjustment lives in the List View Controls menu: Copy, Edit List Filters, Rename, Sharing, Pin and Delete View. A pinned view opens by itself when you enter that tab; one view can be pinned per object. In the mobile app the same actions sit in the view list that the funnel icon opens.
Which operators and logic can a filter use?
Filter operators depend on the field type: a text field has 7 operators, a picklist 4, a number field 8 and a date field 5, which makes 24 in total. Filter logic is one of three options.
| Field type | Operators | Note |
|---|---|---|
| Text | contains, does not contain, equals, not equal, starts with, is filled, is empty | contains, does not contain and starts with ignore letter case; equals compares exactly |
| Picklist | equals, not equal, is filled, is empty | The value is chosen from the options of the field |
| Number | equals, not equal, greater than, greater or equal, less than, less or equal, is filled, is empty | An empty number field counts as 0 in a comparison |
| Date | after this date, before this date, on this date, is filled, is empty | After and before include the day you type |
All must match (AND) is the default: a record enters the list when it meets every filter. With Any can match (OR), meeting a single filter is enough. With Custom logic you combine the filter numbers with AND, OR, NOT and parentheses, for example 1 AND (2 OR 3). If the expression is broken or refers to a filter number that does not exist, the window shows a red warning and Save does nothing.
This operator list is the same one used by validation rules. That has a practical benefit: before switching a rule on, you can build a list view with the same conditions and see how many existing records would be caught.
Which fields can I filter by?
On standard objects the filterable fields are a fixed list: 4 fields on Lead, 5 on Opportunity, 5 on Case, 4 on Account and 3 on Contact. On custom objects every field of the object plus the created date can be filtered.
| Object | Filterable fields |
|---|---|
| Lead | Status, Lead Source, Company, Created Date |
| Opportunity | Stage, Owner, Amount, Close Date, Opportunity Name |
| Case | Priority, Status, Channel, Type, Subject |
| Account | Industry, Owner, Annual Revenue, Account Name |
| Contact | First Name, Last Name, Email |
Picklist values come from the lists of the product itself. A lead has five statuses, from New through Working - Contacted and Qualified to Converted and Lost, and a case has four priority levels. If you changed your stages as described in the sales pipeline stages guide, your own stage names are listed in the Stage filter.
How do I choose columns and sort a list?
Columns are chosen in the Select Fields to Display window of the List View Controls menu, and a list is sorted by clicking a column header. Both belong to the user and the object, not to the view.
- Choosing columns. The window has two boxes: the available fields on the left and Visible Fields on the right. Move a field by double clicking it or with the arrow, and set its position with the up and down arrows. At least one column must stay visible; the first visible column becomes the link to the record.
- Custom fields become columns. The custom fields you add, formula and roll up fields included, sit in the available box. Standard objects also offer the creator, the last modifier, the last modified time and the record id as columns.
- Sorting. The first click on a header sorts ascending, the second descending. A list sorts by one column. Empty values stay at the end in both directions; numbers and dates are sorted by their real value, not as text.
- Column width. Drag the right edge of a header to set the width; a double click on the edge resets it.
- The search box. The "Search this list" box searches the visible columns. If the value you are after sits in a hidden column, make that column visible first.
The consequence of this chart that surprises people most: if you remove the Email column in the "Hot leads" view, it disappears from the other Leads views too. The column layout is your way of looking at that object. An admin can tick "Set as default for the whole org" at the bottom of the window to make a layout the starting point for everyone; a user who saved a personal layout is not affected. All of these preferences are stored on the server and not in the browser, so the same list opens when you sign in from another computer.
How do inline editing and bulk actions work?
Double clicking a row in the table opens the editable cells of that row; Enter saves and Escape cancels. While the Edit button in the toolbar is on, a single click does the same.
- Applying one change to many records. Tick several records and edit one of the selected rows: a box at the bottom of the screen offers to apply this change to all selected records. Tick it and save, and the same change is written to every selected record.
- The selection bar. When you select records a bar appears on top with the number selected. A status change on Leads, a stage change and an owner change on Opportunities, and on every list an export of the selection and Mass Delete live here. With two or three leads, accounts or contacts selected a Merge button appears as well; the details are in the duplicate records guide.
- Rules still apply. Inline editing reads the validation rules; a change that breaks a rule is not saved and a red notice appears.
- The selection is not kept. Switching the view or typing in the search box clears the selection, so a bulk action never reaches a record you cannot see on screen.
Not every column can be edited. System fields such as the created date are read only; the amount of an opportunity that has product lines is calculated from those lines and cannot be changed in the list; and a lead cannot be set to Converted from the list, because conversion is a separate action.
How do I share a list view with the team?
A list view is shared through the Sharing option of the List View Controls menu at one of three levels: Only me, Entire organization and Specific public groups. A new view always starts as personal.
- Only me. The view stays personal and nobody else sees it.
- Entire organization. Everyone in the org can pick the view from the list.
- Specific public groups. Only members of the groups you choose see it. Groups are defined in Setup > Sharing Settings > Public Groups.
Only the owner or an admin can change the filters of a shared view, rename it or delete it. Other users make a personal copy with Copy and edit that as they like. Sharing distributes the view, not the access: in a shared view a user sees only the records they were already allowed to see. Who sees what is decided by the profiles and sharing settings in the user permissions guide.
A saved view is not limited to its tab. In the page editor you can pick a view for a related list or for a record list on a home page, and that list fills with the same filters.
What changes on large lists and how do I export a list?
A list opens 100 rows at a time and loads more as you scroll; on an object with more than 2,000 records, filtering, search and sorting run on the server and records are downloaded page by page. In that second case the kanban layout is not offered.
The Export button downloads the rows that are currently filtered, with the visible columns, as Excel (.xlsx) or CSV. What goes into the file is the list you see on screen: set up the view and the columns first, then download. If you want to group the same list, total it or chart it, the tool you need is not a list but a report.
Not included: what list views do not do
- Columns and sort order are not saved in the view. A separate column layout or a separate sort cannot be defined per view; both are personal and per object.
- No relative date filters. Sliding dates such as today, this month or the last 30 days cannot be chosen; a date filter works against the fixed day you type and has to be updated by hand when the month turns.
- No "my records" filter. The owner filter picks a user by name; a filter that changes with the person opening the view cannot be built.
- No filtering by custom fields on standard objects. Custom fields can be added as columns and sorted, but the filter list of Lead, Opportunity, Case, Account and Contact is the fixed set above.
- 8 filters at most. A ninth filter cannot be added.
- Two fields cannot be compared with each other. The value is always fixed; a filter such as "close date before created date" cannot be built.
- No multi column sort, grouping or subtotals. A list sorts by one column; grouping and totals are done in a report.
- No scheduled export. A list is not emailed by itself; exporting is a manual action.
- No kanban on objects above 2,000 records. Kanban works when all records are on screen.
- No shared editing of a shared view. Anyone other than the owner and an admin cannot change the view, only copy it.
- Some labels stay in Turkish in the English interface. In the New List View window the operator names, the field names in the filter row and the view name label appear in Turkish, as do the names of the two sample views and of the bulk change menus.
How do you keep list views tidy across a team?
List views stay tidy when they are few and each one answers a single question. Nobody finds what they need in a menu of fifteen views.
A routine that works: start with two or three shared views per object and give each a name that states the question. Make updating the date filtered views at the start of the month one person's job. Let everyone pin their own daily list, so the right list opens when they enter the tab. Do not share personal experiments; share them once they prove useful. All sales records live in Sales360, and the same list component works in the same way on the service and marketing tabs.